
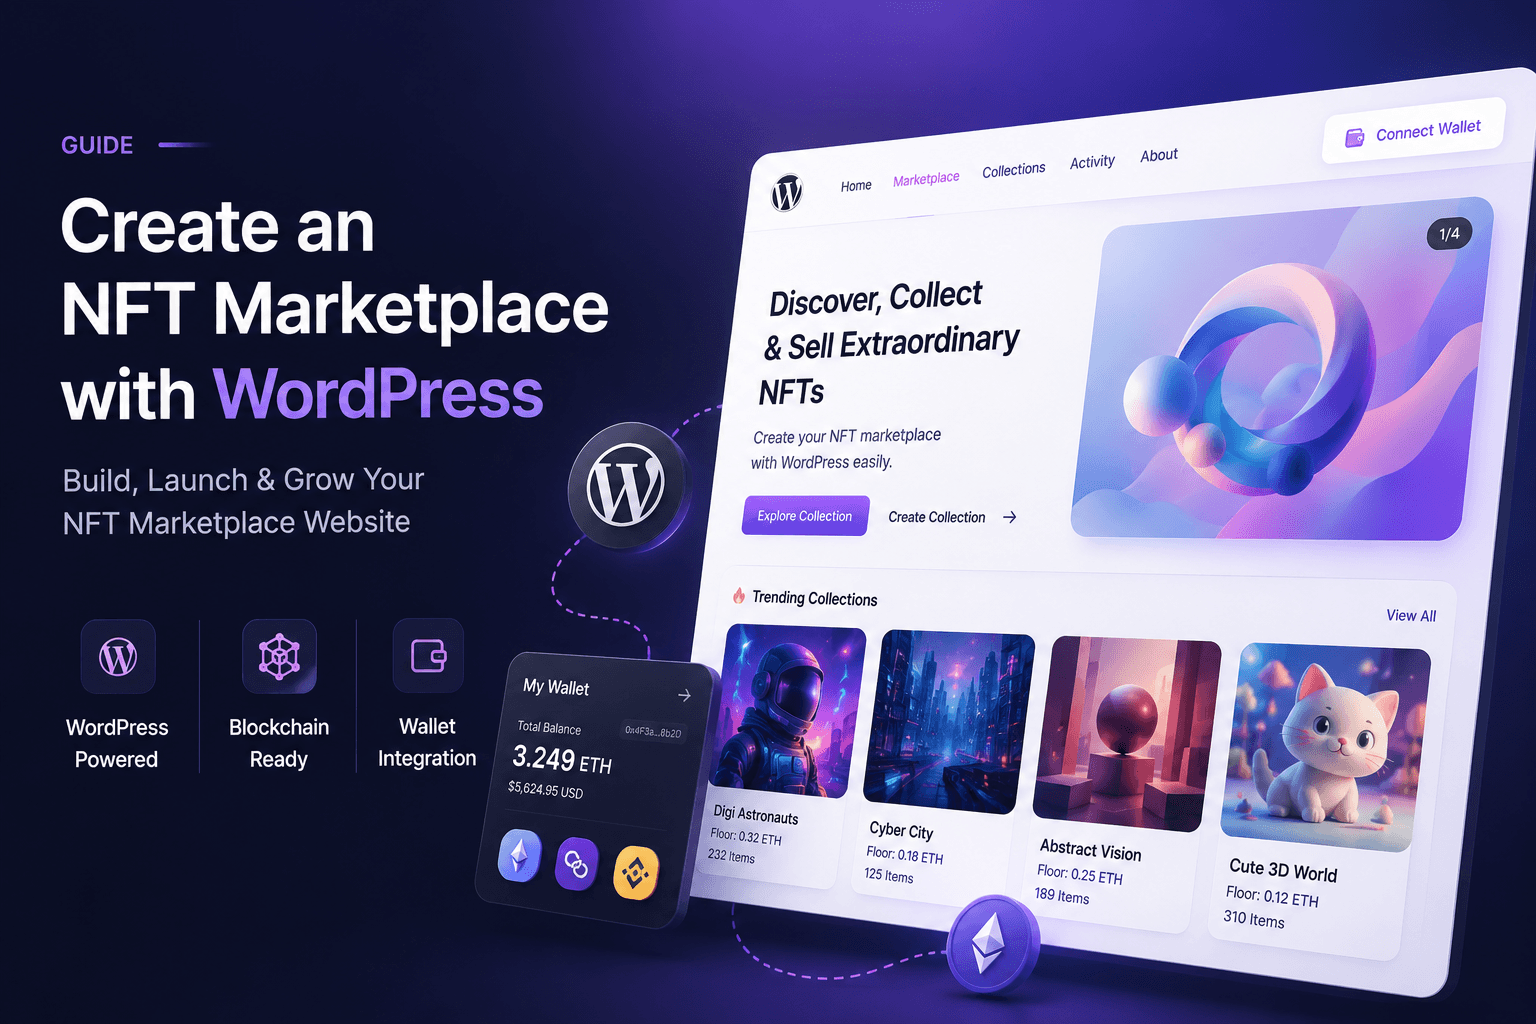
You can create an NFT marketplace with WordPress by combining a reliable WordPress setup, an NFT marketplace plugin, a supported blockchain network, wallet connectivity, smart contracts, decentralized asset storage, and a carefully tested buyer-and-seller journey.
The plugin makes the project more accessible, but it does not remove the need to understand how wallets, gas fees, token standards, smart contracts, metadata, and blockchain transactions affect your users. A successful NFT marketplace is not simply a gallery with a “Connect Wallet” button. It needs a complete workflow for creating, listing, discovering, buying, reselling, and managing digital assets.
This guide explains how to create an NFT marketplace with WordPress from planning to launch. It also shows where a dedicated solution such as Smart NFT can reduce custom development work without pretending that every marketplace can be launched with identical settings.
How to Create an NFT Marketplace with WordPress: The Process at a Glance
The practical process is to define your marketplace model, choose a token standard and blockchain, prepare WordPress, install a compatible NFT marketplace plugin, connect wallets, deploy and verify the required smart contracts, configure marketplace pages and fees, and test the entire transaction journey on a testnet before launch.
- Decide who can create, list, buy, and resell NFTs.
- Choose ERC-721 or ERC-1155 based on the assets you plan to offer.
- Select a supported blockchain and test network.
- Prepare a secure WordPress website with HTTPS and backups.
- Install an NFT marketplace WordPress plugin that supports the required workflow.
- Connect an administrative wallet and configure smart contracts.
- Create the marketplace, NFT, collection, profile, and help pages.
- Set listing rules, platform fees, royalties, and creator permissions.
- Test minting, buying, resale, wallet errors, and ownership updates.
- Launch with a small, controlled collection before opening the platform widely.
The rest of this guide explains each stage in detail so you can create an NFT marketplace with WordPress without overlooking the operational and blockchain requirements behind the interface.
What You Need to Build an NFT Marketplace with WordPress
A WordPress NFT marketplace usually has two connected layers.
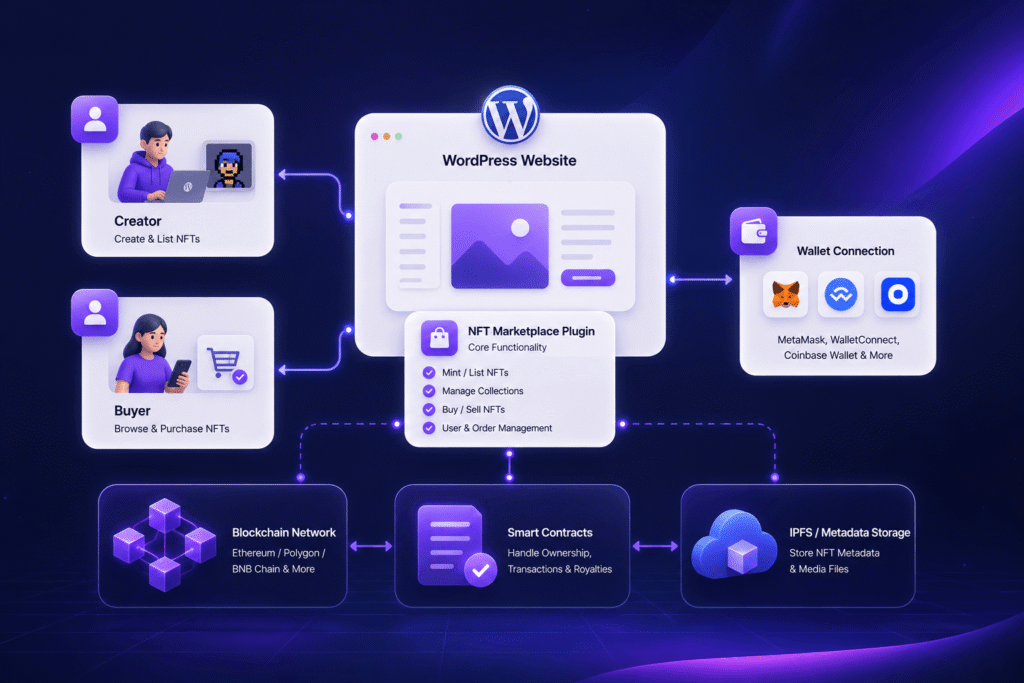
- The WordPress layer manages your pages, branding, content, user-facing marketplace interface, search, profiles, settings, and supporting business workflows.
- The blockchain layer records token ownership and executes actions such as minting, listing, transferring, purchasing, or reselling NFTs through smart contracts.
You will normally need:
- A domain name, hosting account, SSL certificate, and current WordPress installation
- A lightweight, responsive WordPress theme
- An NFT marketplace plugin that supports your intended workflow
- A compatible browser wallet such as MetaMask
- A blockchain network and native currency for transaction fees
- NFT and marketplace smart contracts
- A storage method for NFT media and metadata, often including IPFS
- Test wallets and testnet funds for quality assurance
- Clear marketplace rules, fees, support documentation, and legal policies
WordPress can simplify the website and administration side of the project. The blockchain still determines how ownership and transactions work. Plan both layers before installing plugins.
Step 1: Define the NFT Marketplace You Want to Build
Start with the marketplace model rather than the design. The features required for an artist’s collection website are very different from those required for a public multi-creator marketplace.
Single-creator NFT store
A single creator or brand mints and sells its own NFTs. This is the simplest model because you do not need open creator onboarding, public collection creation, seller moderation, or complex marketplace governance.
Curated marketplace
Approved artists or partners can create collections and list NFTs. The marketplace owner reviews creators and controls who can publish. This model is often easier to manage than a completely open marketplace while still supporting multiple sellers.
Open multi-creator marketplace
Users connect wallets, create profiles, mint assets, build collections, list NFTs, and potentially resell purchased items. This model requires stronger moderation, creator permissions, anti-spam controls, support processes, and transparent fee rules.
Membership, loyalty, or utility marketplace
NFTs can represent access, membership, rewards, certificates, redeemable benefits, or digital ownership rather than collectible artwork alone. WooCommerce has documented uses such as token-gated experiences, discounts, physical-product redemption, and community engagement. Decide whether your marketplace is primarily about trading assets or delivering a broader customer experience.
Write down who can mint, who can list, which assets are accepted, how sellers are approved, whether resales are allowed, and how the platform earns revenue. These decisions shape every technical step that follows.
Step 2: Choose the Right NFT Token Standard
The two standards you will see most often in WordPress NFT marketplace tools are ERC-721 and ERC-1155.
| Standard | Best suited to | Key consideration |
|---|---|---|
| ERC-721 | Unique, individually owned NFTs | Each token has a unique identifier and is treated as a distinct asset |
| ERC-1155 | Multiple editions, gaming assets, or mixed token types | One contract can manage multiple token types and quantities |
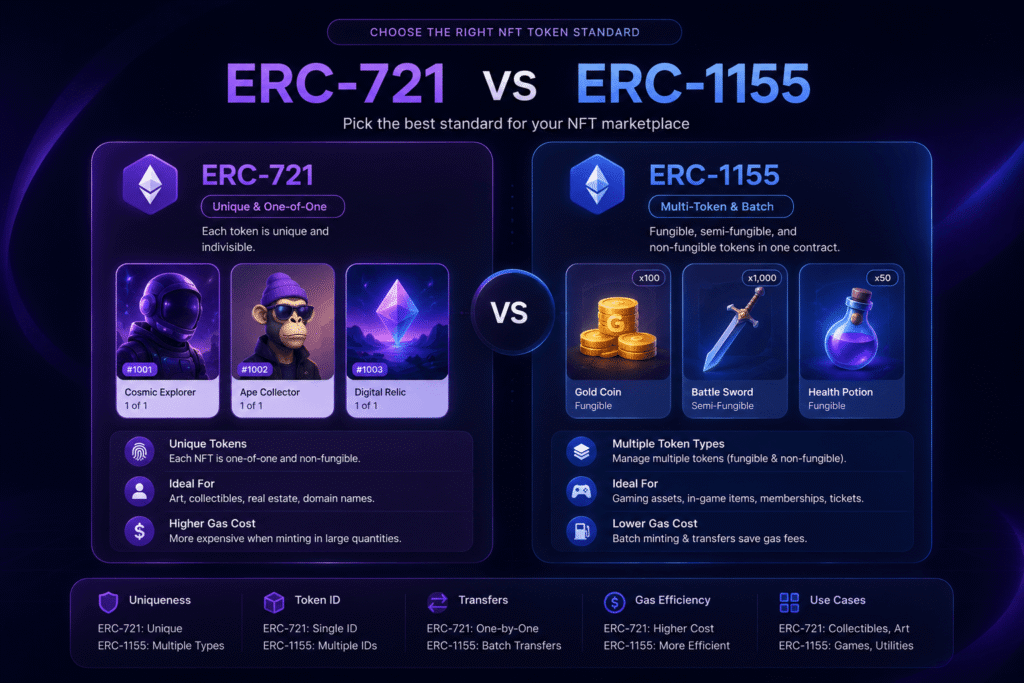
ERC-721 defines a standard interface for tracking and transferring unique non-fungible tokens. It is a natural choice for one-of-one artwork, individual collectibles, certificates, or other uniquely identified assets.
ERC-1155 can manage multiple fungible, non-fungible, or semi-fungible token types within one contract. It is useful when creators need editions, multiple quantities, game items, or batch-oriented workflows.
Do not choose a standard only because it appears more advanced. Use the simplest standard that fits the marketplace’s asset model. Also verify that your plugin supports the selected standard across the full workflow—not only during minting, but also in listings, transfers, ownership displays, royalties, and resale.
Step 3: Select a Blockchain Network
Your network choice affects transaction costs, wallet compatibility, settlement speed, liquidity, and the audience that can use the marketplace.
Evaluate each candidate network using practical questions:
- Does your selected WordPress plugin support the network?
- Do the marketplace and NFT contracts support it?
- Which wallet will buyers and creators use?
- How much can minting, approval, listing, purchase, and resale transactions cost?
- Can you test the complete workflow on a corresponding test network?
- Will external wallets and marketplaces display the tokens correctly?
- Is the network appropriate for your target audience and asset value?
A lower-fee network may reduce friction for frequent or lower-value transactions. A more established ecosystem may offer broader wallet and marketplace support. There is no universally correct answer, so avoid promising users “zero fees” unless your specific implementation genuinely covers every applicable transaction.
Step 4: Set Up WordPress, Hosting, and SSL
Install WordPress on a production-quality hosting environment with HTTPS enabled. Wallet connections and marketplace interactions should never be launched on an insecure or poorly maintained site.
Your hosting plan should comfortably handle marketplace pages, user profiles, media previews, API requests, scheduled tasks, and traffic spikes. Blockchain transactions do not run inside your hosting account, but the user interface and application logic still depend on WordPress performance.
Before adding the NFT system:
- Update WordPress, the active theme, and required plugins
- Enable HTTPS across the entire site
- Configure reliable backups and off-site storage
- Use a staging environment for changes
- Remove unused themes and plugins
- Configure caching carefully so wallet-specific data is not served to the wrong user
- Set readable permalinks
- Create administrator accounts with strong authentication
The official WordPress hardening guidance recommends keeping WordPress, themes, and plugins current and reducing the damage an attacker could cause. An NFT marketplace should treat these practices as launch requirements rather than optional maintenance.
Step 5: Choose an NFT Marketplace WordPress Plugin
A gallery or OpenSea embed plugin is not the same as a marketplace plugin. Before purchasing anything, map the plugin against your required user journey.
It also helps to compare marketplace builders with simpler minting, selling, and collection-display tools. Our guide to the best NFT WordPress plugins explains why plugins that use the same “NFT” label may solve very different problems.
For most non-technical teams, choosing the right plugin is the fastest way to create an NFT marketplace with WordPress without developing every wallet, profile, listing, and marketplace interface from scratch.
Look for support for the functions you actually need:
- Wallet connection and wallet-based authentication
- Smart contract deployment or connection to existing contracts
- NFT and collection creation
- Media and metadata storage
- Fixed-price listings, auctions, or both
- Buying, removing from sale, transferring, and reselling
- Creator and owner information
- Marketplace fees and royalty handling
- Search, filtering, collections, and public profiles
- Mobile-responsive marketplace pages
- Network switching and incorrect-network messages
- Documentation, updates, and support
Where Smart NFT fits
Smart NFT is a premium WordPress plugin designed for building an on-site NFT marketplace. Its product listing describes NFT minting, smart contract deployment and management, lazy minting, unlockable content, marketplace listings, resale, creator and owner displays, filters, wallet-based profiles, MetaMask authentication, shortcodes, and multilingual compatibility.
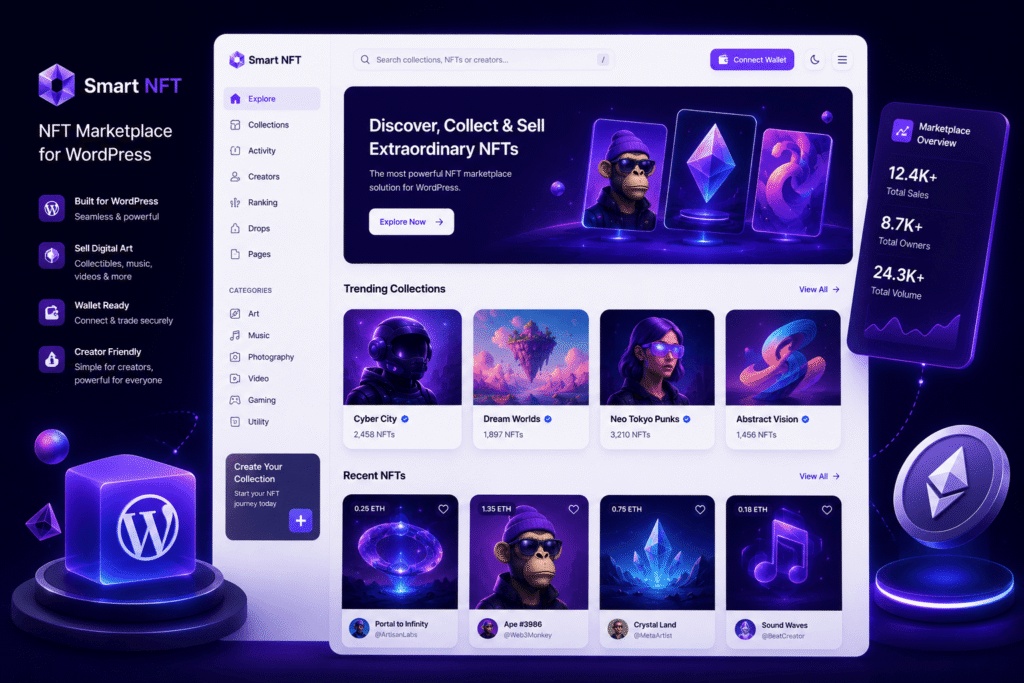
The listing also references ERC-721, ERC-1155, auctions, and multichain functionality. However, some extended capabilities are associated with separate add-ons. Confirm which standard, network, auction, token-payment, KYC, or multichain features are included in the exact package you plan to use before designing your marketplace around them.
Smart NFT is most relevant when you want the marketplace experience to remain on your own WordPress website instead of sending every visitor to a third-party marketplace. It may not be the right option when you only need to display an existing OpenSea collection or sell a small number of pre-minted assets through a conventional store workflow.
You can review the current package, documentation links, and live preview on the Smart NFT product page before deciding which core features and add-ons your project requires.
Step 6: Install and Configure the NFT Marketplace Plugin
Install the plugin according to its official documentation and activate only the add-ons required for your initial release. Adding every available extension before you understand the core workflow increases complexity and makes troubleshooting harder.
Your first configuration pass should cover:
- Marketplace identity: name, logo, currency display, branding, and support details.
- Network settings: main network, test network, RPC configuration, block explorer, and chain identifiers.
- Wallet settings: supported wallet, login behavior, network prompts, and disconnected states.
- Contract settings: NFT contract, marketplace contract, proxy or approval contract, and any auction contract.
- Storage settings: where media and metadata are uploaded and how failures are handled.
- Creator permissions: who can mint, create collections, upload files, or publish listings.
- Fees: listing fees, marketplace commissions, royalties, and responsibility for gas costs.
- Marketplace pages: NFT archive, collection archive, single NFT, profile, creation, and dashboard pages.
Record the final configuration in an internal document. Marketplace administrators should know which contract addresses, networks, wallets, API services, and storage providers the live website uses.
Step 7: Connect a Wallet and Deploy Smart Contracts
Wallet connection is the bridge between the visitor and the blockchain. It should clearly communicate whether the wallet is disconnected, connected to the wrong network, waiting for a signature, or waiting for a transaction confirmation.
Use a dedicated administrative wallet for deployment and marketplace management. Do not casually reuse a personal wallet that holds unrelated assets. Protect recovery phrases offline, limit who can access the wallet, and document how ownership or administrative control can be transferred if team responsibilities change.
During contract deployment:
- Confirm the selected network before approving the transaction
- Review token name, symbol, supply rules, fees, and royalty settings
- Store every deployed contract address
- Save the deployment transaction hash
- Verify the contract source when the implementation supports verification
- Test administrative permissions and ownership
- Never treat a testnet address as a production address
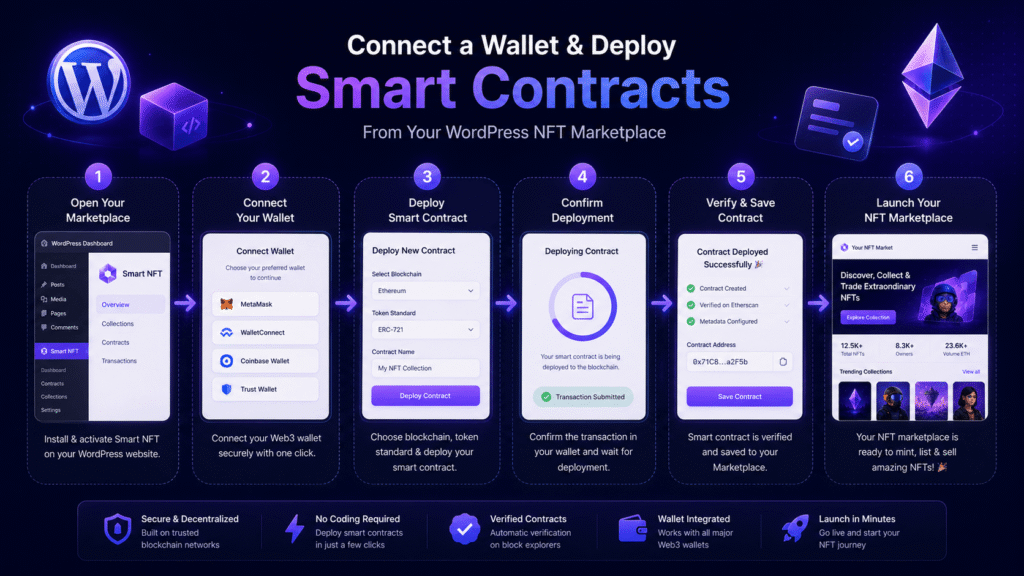
A smart contract is a program running on the blockchain. Once deployed, changing its behavior may be difficult or impossible unless the architecture explicitly supports upgrades. Treat deployment as a production release, not a routine WordPress setting change.
Step 8: Create the Essential Marketplace Pages
A functional NFT marketplace needs more than a homepage. Build the pages required for a visitor to understand the project and complete a transaction without guessing what to do next.
Marketplace or Explore page
Display available NFTs with useful filters such as collection, creator, price, status, token standard, or network where supported. Each card should communicate the asset name, preview, price, creator or collection, sale status, and relevant auction timing.
Single NFT page
Show the media, description, owner, creator, collection, price, token details, contract address, transaction action, and relevant history. Explain what the buyer receives, especially when the NFT includes unlockable content, membership, redemption, or usage rights.
Collection page
Present collection identity, creator, description, items, verified contract information, and available statistics without implying guarantees about future value.
Creator or wallet profile
Provide a public identity layer for created, owned, and listed NFTs. If profiles can be edited from the front end, validate user permissions carefully and show which wallet controls the profile.
Create NFT and collection pages
Keep forms focused. Explain accepted file types, size limits, metadata, supply, royalties, unlockable content, minting method, transaction costs, and what becomes permanent after minting.
Help, fees, terms, and risk pages
Publish wallet instructions, transaction troubleshooting, platform fees, royalty rules, prohibited content, intellectual-property policy, privacy information, terms of use, and support channels. Users should not discover important fees only after opening a wallet confirmation.
Step 9: Configure NFT Media and Metadata
The token itself does not usually store the full image, video, audio file, or detailed description directly on-chain. Instead, the smart contract often points to metadata that references the media.
Before launch, confirm:
- Which media types and file sizes the plugin accepts
- Whether media and metadata use IPFS or another storage system
- Who pays for storage-related services
- What happens when an upload fails halfway through minting
- Whether metadata can be changed later
- How missing thumbnails, video previews, and audio artwork are handled
- Whether the same asset appears correctly in external wallets and explorers
Do not promise permanent storage merely because a URL begins with an IPFS-style address. Confirm how content is pinned, retained, and funded over time.
Step 10: Configure Listings, Fees, Royalties, and Resales
Your business model must be understandable before users approve transactions.
Possible marketplace charges include:
- Smart contract deployment costs
- Minting gas fees
- Token approval or marketplace approval fees
- Listing fees
- Platform commission on sales
- Creator royalties on secondary sales
- Auction-related transactions
- Removing an item from sale
- Transferring an NFT
- External storage or API costs
Lazy minting can shift the on-chain mint transaction until a buyer purchases the asset, reducing the creator’s upfront cost in some implementations. It does not make every marketplace action free. Explain exactly which party pays each cost and at what point.
Royalty behavior also depends on the contract and marketplace implementation. Avoid describing royalties as universally guaranteed across every external marketplace. Document how royalties work inside your own platform and where enforcement may differ.
Step 11: Test the Complete Marketplace on a Testnet
Do not use the production network for your first end-to-end test. A testnet lets you evaluate the interface and contract workflow without risking production assets or substantial real transaction costs.
Test with at least three separate wallets:
- An administrator or contract-owner wallet
- A creator or seller wallet
- A buyer wallet
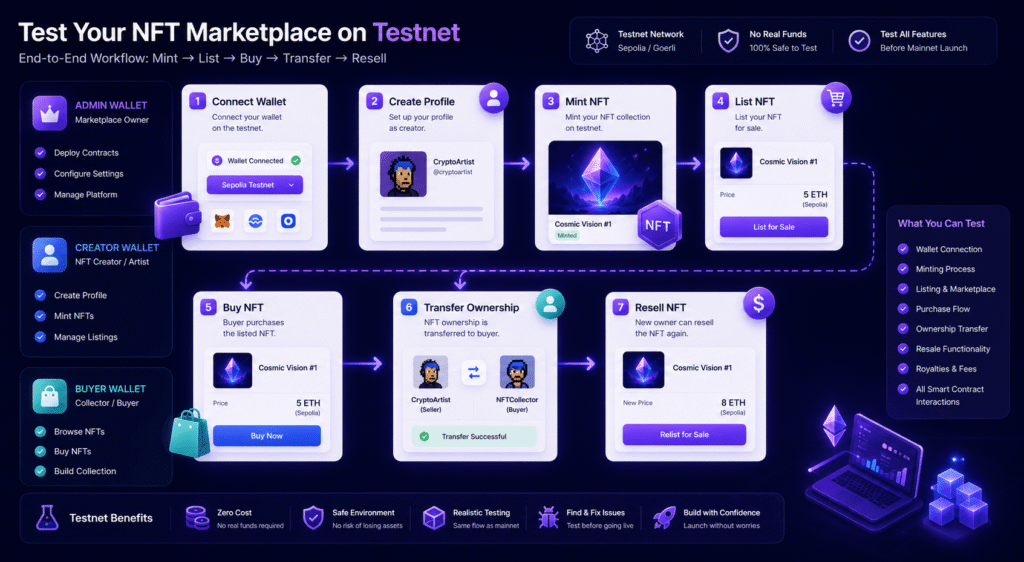
Run the following scenarios from start to finish:
- Connect a new wallet.
- Reject the signature request and confirm the site recovers gracefully.
- Connect to the wrong network and follow the correction prompt.
- Create a profile and collection.
- Upload an asset and mint an NFT.
- Create a fixed-price listing.
- Purchase it from another wallet.
- Confirm ownership changes on the site and block explorer.
- Resell the NFT where supported.
- Remove an item from sale.
- Test royalties and platform-fee distribution.
- Test an auction and failed bid if auctions are enabled.
- Refresh and revisit every relevant page on mobile.
- Test unavailable RPC, storage, and API responses.
A transaction can succeed on-chain while the WordPress interface fails to update correctly. Always verify both the blockchain record and the website state.
Step 12: Secure the WordPress and Blockchain Layers
An NFT marketplace has a wider attack surface than a typical brochure website. Security must cover WordPress accounts, plugin code, wallet interactions, smart contracts, APIs, storage, and administrative procedures.
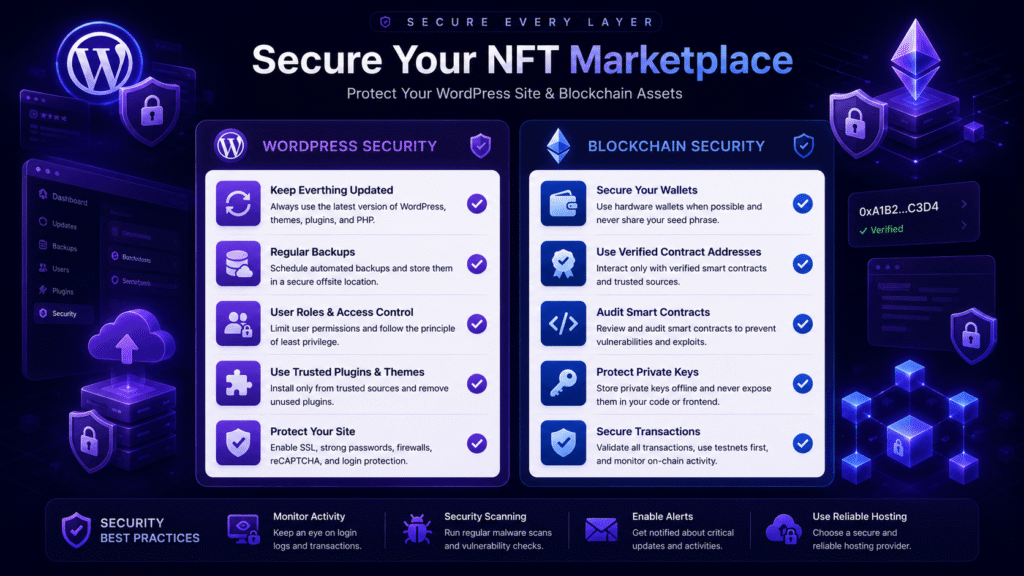
At a minimum:
- Keep WordPress, the theme, and plugins updated
- Use a staging site and tested backup process
- Limit administrator access
- Protect deployment and treasury wallets
- Never request or store users’ private keys or seed phrases
- Review contract permissions and ownership
- Verify contract addresses displayed on the website
- Sanitize uploads and restrict supported file types
- Rate-limit sensitive public actions where appropriate
- Monitor failed wallet, API, storage, and transaction requests
- Use clearly verified download sources for plugins and add-ons
- Consider an independent smart contract audit for a serious public marketplace
Ethereum’s security guidance notes that NFT risks commonly include phishing, smart contract vulnerabilities, and user mistakes such as exposing private keys. Your interface should therefore explain every signature and transaction in plain language rather than training users to approve unexplained wallet prompts.
Step 13: Prepare Legal, Copyright, and Marketplace Policies
Technology does not decide whether a creator owns the rights to mint a file. Establish rules covering intellectual property, prohibited content, impersonation, takedown requests, refunds, disputes, sanctions, taxes, privacy, consumer rights, and the legal meaning of any utility or benefit attached to an NFT.
Also make it clear that buying an NFT does not automatically transfer copyright or every commercial right associated with the underlying media. The rights received by the buyer should be written in understandable terms.
Requirements differ across countries and marketplace models. Obtain qualified legal and tax advice for the jurisdictions in which the marketplace, sellers, and buyers operate.
Step 14: Launch with a Controlled First Collection
A smaller controlled launch is safer than opening creator registration to everyone on day one.
Start with:
- One verified production contract setup
- A limited number of approved collections
- A small group of creators and test buyers
- Documented fees and transaction instructions
- Real-time monitoring during the first mint and sale
- A rollback plan for the WordPress interface
- A communication plan for blockchain transactions that cannot be reversed
Track wallet connection failures, abandoned minting attempts, failed transactions, slow pages, support questions, and places where users misunderstand fees. Improve those areas before adding more creators, networks, token standards, or marketplace features.
Common Mistakes to Avoid
Treating the marketplace as a visual template
A polished grid does not prove that minting, ownership, buying, resale, or fee distribution works. Test the transaction lifecycle before spending heavily on visual customization.
Launching directly on a main network
Configuration mistakes become expensive when real funds and permanent contract deployments are involved. Complete the workflow on a test network first.
Hiding gas and marketplace fees
Unexpected wallet costs damage trust. Explain likely transaction points before the user starts minting or buying.
Assuming every feature is included in the core plugin
Some marketplace products use separate add-ons for auctions, ERC-1155, multichain support, KYC, token payments, or media formats. Verify the complete stack and total cost before implementation.
Ignoring creator moderation
An open minting form can attract spam, copied artwork, misleading collections, and support problems. Start with controlled permissions and a documented review process.
Promising investment returns
Describe the marketplace’s functionality and asset utility without guaranteeing value, scarcity-driven profit, resale demand, or future price appreciation.
How Much Does It Cost to Create an NFT Marketplace with WordPress?
The total cost depends on much more than the WordPress plugin. Budget for:
- Domain, hosting, backups, email, and security services
- Premium NFT marketplace plugin and required add-ons
- Theme or custom interface work
- Smart contract deployment and transaction fees
- RPC, API, IPFS pinning, or storage services
- Testing and quality assurance
- Smart contract review or audit
- Legal documentation and compliance advice
- Ongoing support, monitoring, and updates
A plugin can substantially reduce the cost of building the WordPress interface and common marketplace workflows from scratch. It cannot remove blockchain costs, operational responsibility, security review, or support work.
Is WordPress the Right Platform for Your NFT Marketplace?
WordPress is a practical option when you want control over your brand, content, landing pages, creator education, search visibility, and marketplace interface without building an entire web application from zero.
It is particularly useful for:
- Creators launching a branded marketplace
- Agencies building a managed Web3 project for a client
- Communities adding NFT ownership or utility to an existing site
- Brands combining editorial content, commerce, and token-based experiences
- Teams validating an NFT marketplace concept before funding a fully custom platform
A custom application may be more appropriate when the project requires high-frequency trading, extensive off-chain order infrastructure, deeply customized wallet abstractions, proprietary smart contracts, complex cross-chain routing, or large-scale real-time data processing.
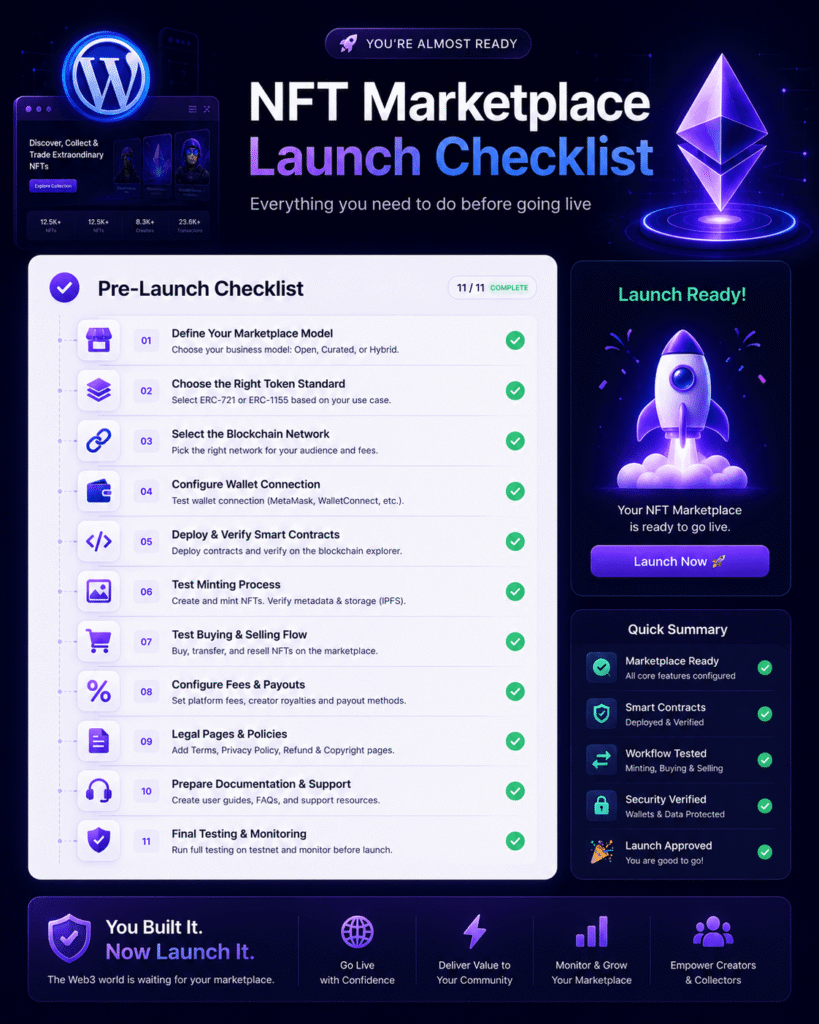
Final Launch Checklist
- The marketplace model and creator permissions are documented
- The chosen network and token standard match the asset model
- All production contract addresses are verified
- Wallet connection, wrong-network, rejection, and failure states work
- Minting, listing, buying, resale, and removal have been tested
- Marketplace fees and gas responsibilities are visible
- NFT media and metadata remain available after testing
- Mobile marketplace pages are usable
- WordPress backups and security controls are active
- Terms, privacy, copyright, and prohibited-content policies are published
- Support documentation covers common transaction problems
- The first production collection has a monitored launch plan
Conclusion
The most reliable way to create an NFT marketplace with WordPress is to treat it as a complete product rather than a plugin demo. Define the marketplace model, choose the token standard and blockchain, secure the WordPress installation, configure wallets and contracts, build the required pages, and test every transaction on a testnet before going live.
A dedicated solution such as Smart NFT can provide a practical foundation for minting, marketplace listings, resale, profiles, wallet authentication, filters, and related marketplace workflows on WordPress. Review the current core feature set and required add-ons against your exact launch plan, then begin with a controlled marketplace rather than enabling every feature at once.
Ready to explore a self-hosted WordPress NFT marketplace? Review the Smart NFT feature set and live preview to see whether its workflow fits your creators, network, token standard, and marketplace model.
Frequently Asked Questions
Can I create an NFT marketplace with WordPress?
Yes. WordPress can provide the marketplace website, user interface, content system, profiles, and administrative controls, while a compatible plugin, wallet, and smart contracts handle NFT creation and blockchain transactions. The easiest way to create an NFT marketplace with WordPress is to use a dedicated marketplace plugin and validate the complete workflow on a testnet before deploying production contracts.
Do I need coding skills to build a WordPress NFT marketplace?
A marketplace plugin can reduce the amount of custom coding required. You still need to understand networks, wallets, contracts, transaction fees, permissions, testing, security, and marketplace operations. Complex customizations may require WordPress and blockchain development expertise.
Can users mint NFTs directly on my WordPress site?
They can when the selected plugin and smart contracts support front-end minting. You should control which users can mint, what media they can upload, how metadata is stored, and who pays transaction fees.
What is the difference between ERC-721 and ERC-1155?
ERC-721 is designed around uniquely identified non-fungible tokens. ERC-1155 can manage multiple token types and quantities in one contract, making it useful for editions, gaming items, and mixed token models.
Can I use WooCommerce to sell NFTs?
Yes, some extensions connect NFTs to a conventional WooCommerce product and checkout flow. A full wallet-native NFT marketplace is different because it may also include public minting, on-chain listings, resales, auctions, creator profiles, and smart contract interactions.
Does lazy minting remove all gas fees?
No. Lazy minting typically delays the mint transaction until purchase and may shift that cost to the buyer or another party. Other actions—such as deployment, approval, listing, purchase, transfer, or resale—may still require blockchain fees.
Is an NFT marketplace secure because it uses blockchain?
No system is automatically secure. Blockchain records can be tamper-resistant while the website, wallet prompts, smart contracts, APIs, administrator accounts, or user behavior remain vulnerable. Security must cover the entire marketplace stack.
Should I launch on a testnet first?
Yes. Testnet deployment lets you validate wallet connection, minting, listings, purchases, resale, fees, metadata, and error handling before real assets and funds are involved.